

How to Install and Commission an HMK Series Hydraulic Motor Correctly
2025-12-16
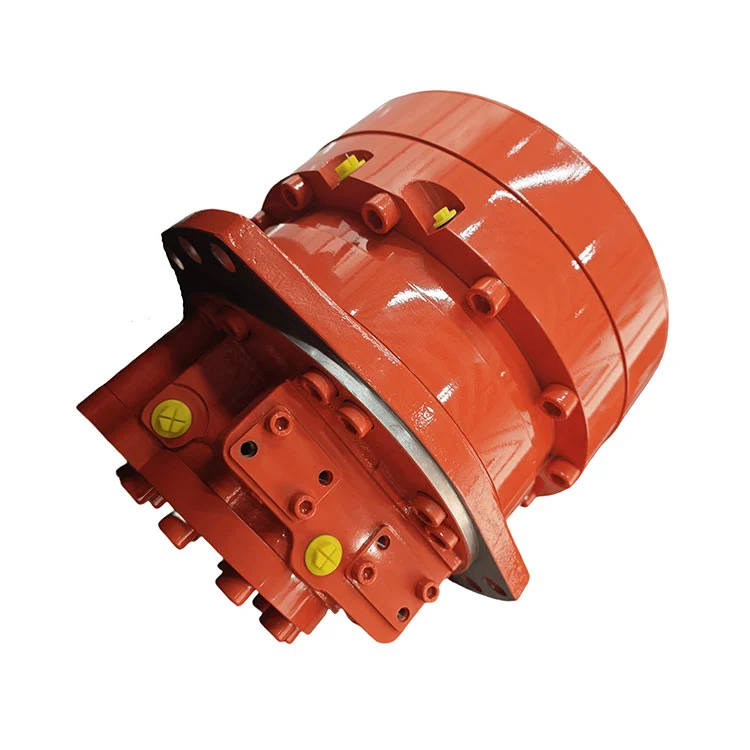
Proper installation and commissioning are critical to unlocking the full performance, reliability, and longevity of your Helm Tower HMK Series Hydraulic Motor. As a high-torque, low-speed radial piston motor, the HMK Series Hydraulic Motor is engineered for demanding applications. Following a precise procedure ensures optimal operation and prevents premature failure. This guide outlines the essential steps.
Pre-Installation Checklist & Key Parameters
Before mounting, verify the motor model against your application requirements. Key parameters for the Helm Tower HMK Series include:
-
Displacement Range: Available from 160 cc/rev to 8000 cc/rev to match specific torque needs.
-
Maximum Operating Pressure: Up to 450 bar for high power density.
-
Speed Range: Designed for stable operation from very low speeds up to the specified maximum.
-
Shaft Configuration: Available with standard keyed shaft, splined shaft, or wheel hub options.
Ensure you have the correct hydraulic fluid, seals compatible with the fluid, proper filtration (recommended 10 microns absolute), and all necessary mounting hardware.
Step-by-Step Installation & Commissioning Guide
-
Mechanical Mounting: Securely mount the motor to a rigid, flat surface, ensuring the shaft is aligned within 0.1mm TIR to avoid side loads. Use a dial indicator for accuracy.
-
Hydraulic Connection: Connect ports according to the rotation direction requirement. Use clean, deburred pipes or hoses. The Helm Tower HMK motor typically has two main work ports (A & B) and a case drain port (T).
-
Crucial: The case drain line must be sized correctly and run directly to the tank with minimal backpressure (< 0.5 bar). This protects the shaft seals.
-
-
Initial Filling: Before starting, fill the motor and lines with clean, filtered hydraulic fluid. Loosen the high-pressure port to allow air to escape during filling.
-
Commissioning Start-Up:
-
Bleeding: With the case drain line disconnected at the tank, jog the system at low pressure to allow air to purge from the drain port. Once a steady stream of oil flows, reconnect.
-
Run-In: Operate the motor at low pressure (20-30% of max) and partial displacement for 10-15 minutes. Gradually increase pressure and speed while monitoring for leaks, unusual noise, or overheating.
-
-
Final Check: Verify smooth operation in both directions. Confirm case drain flow is within specified limits and that external housing temperature is stable.
HMK Series Hydraulic Motor FAQ
Q: What is the most critical step during installation to prevent seal failure?
A: Ensuring the case drain line is properly installed with minimal backpressure is paramount. Excessive backpressure on the T-port directly leads to shaft seal extrusion and premature oil leakage, protecting the integrity of your Helm Tower investment.
Q: Can the HMK motor be installed in any orientation?
A: Yes, the Helm Tower HMK Series Hydraulic Motor is designed for flexible mounting in any position. However, when mounted vertically (shaft up or down), ensure the case drain port is oriented to allow complete air bleeding during initial start-up.
Q: Why is a run-in period necessary after installation?
A: The run-in period allows internal components to seat properly under controlled conditions. It ensures even distribution of lubrication, removes any microscopic debris from assembly, and stabilizes internal clearances, which maximizes efficiency and service life for your HMK Series Hydraulic Motor.
Ensure Peak Performance from the Start
A correctly installed HMK Series Hydraulic Motor is a cornerstone of efficient hydraulic system performance. By adhering to these guidelines and respecting the robust engineering of Helm Tower products, you guarantee a reliable and powerful drive solution.
For specific technical drawings, detailed torque curves, or application engineering support, do not hesitate to contact our expert team directly. Contact Us today to ensure your project's success.